The Microsoft 365 suite includes one of the most complete calendar apps out there. It comes with different features to help you manage and organize both your personal and professional tasks. Once you learn and understand how to get the most out of it, you’ll be able to go through your work activities more efficiently than ever before.
1. How to use a shared calendar in Outlook
Sharing calendars with your coworkers can be pretty useful to avoid communication mistakes and make sure that everyone has the same information regarding important dates and events. To share your calendar with people (that may or may not belong to your company), go to the Home menu and in your calendar folder select “Share Calendar”.

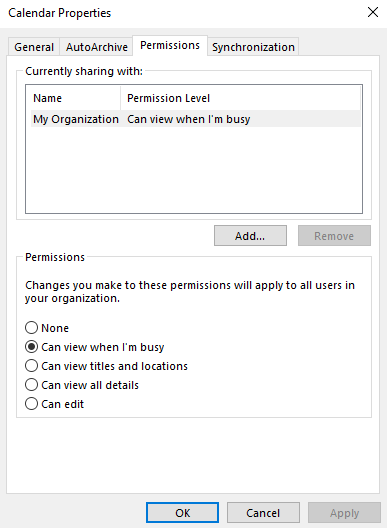
Choose the calendar that you wish to share and go to its properties. There you’ll be able to add or remove users as well as manage the permissions they have. When you’re done, click Ok and your coworkers will receive a sharing invitation.
2. How to create a new meeting in Outlook
Outlook has the option of creating events that are just for you (appointments) and creating group activities (meetings). The difference is simply that in the second one you can invite people.
To create a new appointment you have to go to your calendar folder and click Ctrl + N or select the option “New Appointment”. Automatically, the event form will appear for you to fill out the information and create your item.

Enter a name for the appointment in the subject box, enter a location for the event, and define the date and time of the appointment. Finally, save your appointment with the “Save & Close” option and wait for Outlook to remind you of the event.
You can create meetings in the same way as the appointments, you’ll just have an extra field to add attendees.
3. How to review calendar permissions in Outlook
Knowing how to manage your calendar permissions will save you a lot of trouble whenever you want to share your Outlook calendar with your coworkers, or on the contrary, stop sharing it with them.
You can view your calendar permissions by selecting the calendar icon located in the lower-left corner of the screen. Right-click the calendar you want to share and select “Properties”.

Then click the permissions tab and select Add or Remove to modify the current permissions that you have for that calendar.
You can select permissions including the creation, modification, and visibility of different items, folders, contacts, and other calendar details. Moreover, you can give different permission levels to the users you share the calendar with.
Reviewers can only view your information, yet, they cannot modify any activity. Authors can create and edit events, but they cannot modify or delete the activities that someone else created. Finally, editors can view, create, edit, and delete all events in your calendar.
4. How to open up an address book in Outlook
When you create an Outlook account, an address book is automatically created for you. But you can create additional address books to create specific groups of contacts and separate your coworkers from your friends or family.
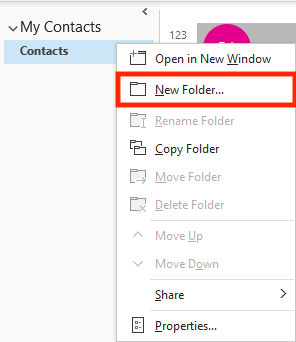
To do so, go to the People option located at the toolbar at the bottom of the screen. Right-click on the Contacts located under the “My Contacts” section and create a new folder.

To turn this new folder into an address book, right-click on it and go to its properties. On the Outlook Adress Book tab, you’ll find an option that says “Show this folder as an e-mail Adress Book”. Check on that option and click Ok.
5. How to change the color scheme in Outlook
One of the top advantages of the Calendar in Outlook is that you can customize its design to make it more attractive, readable, and user-friendly. This will help you categorize your tasks and quickly identify if they’re phone calls, meetings, or other types of appointments just by glancing at the color. You can change the color scheme of each event from the moment you create it or when you modify it.
When creating a new item, click on the Categorize option located in the toolbar at the top and assign the color you like for that appointment. If you want to modify the color of the event, simply right-click on the task and place the cursor on the Categorize option to display different color options.

If you are still struggling with any of the above Outlook features, please contact our remote support desk.

